
20 Table Information
What is a Table?
You learned that tabulations allow information to be put in organized columns. Tables are similar to tabulations but allow for more creativity. With a table, forms, invoices, and lists can be manipulated with color, shape, font changes, rotated 180 degrees. Rows and columns can be added or deleted quickly. Additionally, a table can also be set up to calculate totals.
What is a Row? A Column?
If you think of boxes in a post office lobby or a desk or dresser with many drawers, the horizontal boxes or drawers are rows. Rows are always the horizontal part of a table.

Columns would be the vertical boxes or rows. In this illustration to the right There are two rows and three columns. It is important to understand what is a row and what is a column.
How to Create a Table

From the INSERT TAB, find the Tables Group and the Table icon. Click on the Table icon. A dialog box appears called “Insert Table.” The top portion of this dialog box contains a number of squares arranged in columns and rows. There are also choices listed below the squares.
Inserting a table – Method 1 Select Size.
Using your mouse like a highlighter, select the number of rows and columns you want
for your table by continuing the hold down the left mouse button until you get the number of rows and columns you want. Release your mouse. A table appears on the screen.
 Inserting a table – Method 2. Use a Form.
Instead of selecting the rows and columns desired, click on “Insert Table…”, the first choice on the list underneath the column/rows diagram. An ‘Insert Table’ dialog box appears. (a dialog box is a way to tell the computer what you want, you have a ‘dialog’ with the computer!). Under the heading ‘Table Size,’ you can choose the number of columns and rows by either typing a number in the box or by using the arrow keys to select numbers up or down.
Inserting a table – Method 3 Draw Table. This method is a bit more difficult and is not recommended to students just learning how to create tables. You can try this feature if you want an extra challenge. How to use this feature is not covered in this document.

You have the table, now what?
Cell. A cell is the place that the row and column converge. It is a box shape (see the illustration above.) A cell has four sides – top, bottom, left side, right side.
How do I add a row to an existing table?
Add a row at the end of an existing table. Rows can be quickly added to the end of an existing table simply by placing the insertion point in the last row, the last cell. Press the TAB key and an entire row with the same number of columns appears.
Add a Row in the middle of an existing table. It may be necessary to add a row to a table. Rows can be added above or below a current row in your table. There are two methods to do this.
First Method to add a row.
- Click the insertion point of the mouse in the position where you want to add a new row. A row can be added either above or below the cursor position.
- A new tool bar is open at the top of the screen called Table Tools. There are two tabs: Design and Layout. Click on Layout. (See illustration – letter b. below)
- Find the Rows and Columns Group (See illustration letter c below).
- Find two icons: Insert Above or Insert Below. (See illustration – letter d below) Click on either one depending if you want a row above where your cursor is positioned or below where your cursor is.
- Click on your choice. A row is added to your table.

Second method to add a row.
- Click the insertion point of the mouse in the position where you want to add a new row. A rowcan be added either above or below the cursor position.
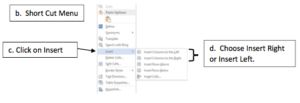
- A short cut menu appears. [continued on next page]
- Click on Insert. (See illustration letter c below).
- A second menu appears. Choose either “Insert a row above” or “Insert a row below.” (See letter d below.)

- Click on your choice. A row is added to your table.
How do I add a column to an existing table?
Add a Column. It may be necessary to add a column to a table. Columns can be insert to the left or to the right of a current column in your table. There are two methods to do this.
First Method to add a column.
- Place the insertion point of the mouse in the position where you want to add a new column. Theinsertion point needs to be just above the top line of the column.
- The insertion point will change to a black down facing arrow. (See illustration – letter b below)
- A new tool bar is open at the top of the screen called Table Tools. There are two tabs: Design and Layout. Click on Layout. (See illustration – letter c below)
- Find the Rows and Columns Group (See illustration letter d below).
- Find two icons: Insert Left or Insert Right. (See illustration – letter e below) Click on either one depending if you want a column insert to the left or right of the current column.
- Click on your choice. A column is added to your table.

Second method to add a column.
- Place the insertion point of the mouse in the position where you want to add a new column. The insertion point needs to be just above the top line of the column. (See illustration labeled b above.)
- A short cut menu appears. (See illustration letter b below).
- Click on Insert. (See illustration letter c below).
- A second menu appears. Choose either “Insert Column to the Left” or “Insert Columns to the Right.” (See letter d below.)
How do I delete a row?
To delete a row. There are two methods to delete a row.
First Method to delete a row.
- Place the insertion point along the side of the row you wish to delete. The insertion point will change to an open arrow. Click on a row and that row will be highlighted. (Your arrow will be a bit smaller than the illustration below.)

- The Table Tools toolbar opens.(Same toolbar seen to add a row or a column.
- Find the Rows and Columns Group.
- Click on the Delete icon. See illustration labeled d below)

- The Delete pull down menu appears. Click on Delete Row. (Notice the other ways to delete – cell, column, or the entire table.

Second method to delete a row:
- Place the insertion point along the side of the row you wish to delete. The insertion point will change to an open arrow. Click on a row and that row will be highlighted. (Your arrow will be a bit smaller than the illustration below.)

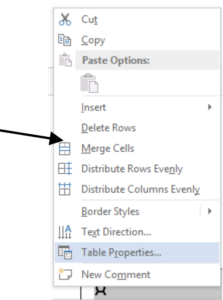
- Right click the highlighted row to get a short cut menu.
- Click Delete Row…option.
How do I delete a column?
To delete a column. There are two methods to delete a column.
First Method to delete a column.
- Place the insertion point of the mouse in the position where you want to delete a column.The insertion point needs to be just above the top line of the column.
- The insertion point will change to a black down facing arrow. Click the mouse to highlightthe column. (See illustration – letter b below.)

|
b. Insertion point turns into a black down-facing arrow. Click the mouse to highlight. |
- The Table Tools toolbar appears. Click on the Layout tab. (See illustration – letter c below)
- Find the Rows and Columns Group (See illustration letter d below).
- Click on the Delete icon.(See illustration letter e below.)
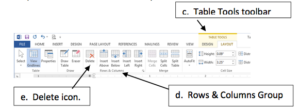
6. Delete icon.

Second method to delete a column:
- Place the insertion point above the column to delete the same way as illustrated in “First method to delete a column” steps a and b above. Click to highlight the column.
- Right click the highlighted row to get a short cut menu
- Click on Delete Column… option to remove the column.

How do I add a title to my table? (Merge Cells – Columns)
Occasionally, you may want to add a title to your table. A title should expand across all the columns in a table. Titles can be added before any information is typed in the table or an extra row can be added above an existing table for the title.
The method of expanding a title across all columns in a table is called Merge Cells.
Inserting a title in a table that was just created. There are two methods.
First Method to input a title.
If you just created a table and there is no information in the table, follow these steps.

a. Select the top row by placing your insertion point to the left of the first row. Click the mouse to highlighting that row.

b. Once selected, the Table Tools toolbar appears. Choose the Layout Tab.

c. Find the Merge Group.
d. Choose “Merge Cells.
e. The result is that the vertical lines indicating columns have been removed allowing a title to extend across the entire table.

Second Method uses a short cut menu.
- Add a new row above the rest of the table data. Follow the stepsfor adding a row on pages 2-3 of this document.
- Select the new top row as was done in First Method Step a above.
- Merge Cells by clicking the right mouse on the highlightedrow to get the short cut menu.
- Click on Merge Cells.

