
17 Tabulation Information
What are tabulations
Tabs allow you to align specific text at a specific location in a document. Basically, you create columns of information. Each column can be set to the same or to a different tab stop.
A Tab Stop is a point on the horizontal ruler. Its position determines where text should be aligned. By default, tab stops are located every 1⁄2 inch (.5 spaces) from the left margin, but you can also set custom tabs stops. This information is about custom tab stops. The Tab Key is located on the keyboard on the left side and is labeled “Tab”
There are five types of tab stops. (see table below and the examples that follow).
|
Type of Tab |
Use to: |
|
Left tab |
Set the start position of text so that text runs to the right of the tab stop as you type. |
|
Center Tab |
Set the center align position of text so that text stays center on the tab stop as you type |
|
Right Tab |
Set the right or end position of text so that text moves to the left of the tab stop as you type |
|
Decimal Tab |
Set the position of the decimal point so that numbers align around the decimal point as you type. |
|
Bar Tab |
Inserts a vertical bar at the tab positon. |
On the next pages are examples of these different tab stops except for the Bars Tab. A bar tab isn’t used for this class.
Left Tab is set at four different positions below. When the Tab Key is pressed it moves to the position that the tab stop was set.. Notice that the text aligns to the left (is even on the left side). This is a Left Tab stop.
For this example, Left Tab Stop positions set at: 1⁄2 inch ( .5), 2 inches, 3 1⁄2 inches, 5 1⁄4 inches

Illustration of the setting for Left Tab Stops.

Center Tab is set at four different positions in the example below. Notice that the columns created by the center tab are centered under each other.
For this example, Center Tab Stop positions have been set at: 1/2 inch (.5), 2 inches, 4 inches, and 6 inches


Illustration of the settings for Center Tab Stops.
In this example, Right Tab Stop positions have been set at: 1 inch, 2.5 inches, 4.3 inches and 6 inches

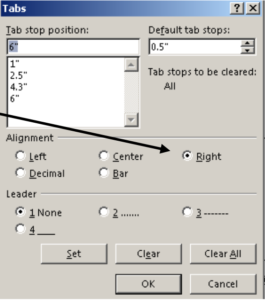 Illustration of the settings for Right Tab Stops
Decimal Tab is set at four different positions. Notice that the decimals are aligned in all the columns no matter how long the number.
For this example, Decimal Tab Stop positions have been set at 1 inch, 2.5 inches, 4 inches, and 5.5 inches

Illustration of the settings for Decimal Tab Stops.
Another choice when setting tabs is to set a dot leader along with one of your tab stop choices. A Dot Leader is a series of dots (periods) that connect one column to another. Sometimes you see this in text books. In the Table of Contents the name of a chapter may have a dot leader that extends from the end of the chapter notation to the page number for the beginning of that chapter.
In the example below, a right tab was paired up with a dot leader so that all the page numbers would be right aligned.
For this example, two tab stops and a dot leader were set. The first tab stop is a Left Tab stop without any leaders (none) for the Chapters. The second tab stop was set for a Right Tab Stop positions at 5.5 with a #2 Leader (dot leader).
Chapter 1………………………………………………………………………………………………… 23
Chapter 2………………………………………………………………………………………………. 123
Note: It is important to know that the dot leader PRECEEDS the tab stop position. Thus fs you are setting two tabs and one is to indent the Chapter and one is to set the page on the right margin, the second tab one would have the leader attached as above. If the leader were attached to the one before the Chapter, a leader would appear to the left of the Chapter name.
Illustration of second tab stop set up.

With the dot leader example, two different tab stops were set, one a left tab stop and the other right tab stop. Below is a combination of four different tab stops.
For this example, Left.Tab Stop 05 inch; Center Tab Stop 2.25 inch with a #2 leader; Right Tab Stop 4.44 inches with #2 leader; Decimal Tab Stop 6,4 inches with #2 leader, No leader attached to the left Tab Stop.

Finding the Tab feature.

From the HOME Tab, find the Paragraph Group. Press the Dialog launcher to find the Tab feature.

The Paragraph Dialog box opens.
At the bottom left corner find the word TAB. Click on the Tab button.
How to set tabs.
When you press the TAB button at the bottom of the Paragraph Dialog Box, this is what the dialog box looks like.

Use this information when setting tabs in your Travel for a Few Dollars a Day Assignment.
